How to Import a Bank Statement into Xero (CSV and OFX)
Prepare a bank CSV or OFX file for Xero, import it into the right bank account and fix the most common Xero import problems.
Xero's bank feeds cover most banks, but there are plenty of reasons to import a statement file instead: a feed that dropped a few days of transactions, a new organisation that needs last year's history, or an account at a bank Xero can't connect to. This guide shows how to prepare the file, import it, and avoid the problems that make Xero reject statements.
Which file formats Xero accepts
Xero's statement import accepts several bank file formats, including CSV and OFX. In practice:
- OFX is the smoothest. There's no column matching and each transaction carries a unique ID, which helps Xero recognise lines you've already imported.
- CSV is the most common, because almost every bank offers it. It needs to be in the right layout first.
Step 1: Download your transactions
In online banking, open the account and export transactions for the period you need. Pick OFX if it's offered (sometimes labelled Money or Microsoft Money), otherwise CSV. If your bank only gives you PDF statements, extract the transactions with a PDF statement converter and choose Xero CSV or OFX as the output.
Start the export the day after the last transaction already in Xero, so you don't import overlapping lines.
Step 2: Put the CSV into Xero's layout
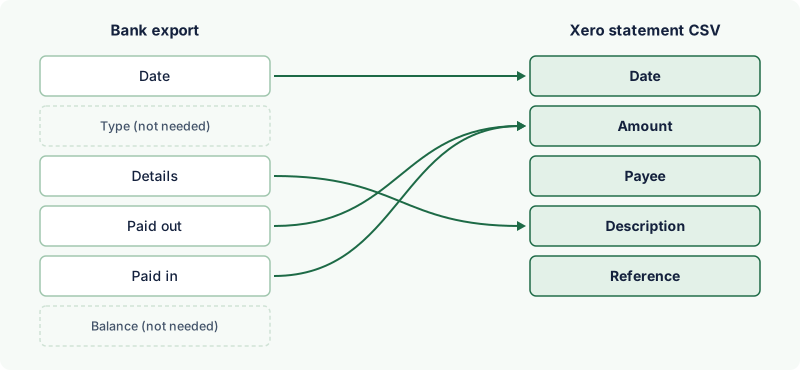
Xero's statement CSV needs:
| Column | Rule |
|---|---|
| Date | Required. Use the format of your organisation's region — DD/MM/YYYY in the UK, MM/DD/YYYY in the US. |
| Amount | Required. A single column: negative for money paid out, positive for money received. |
| Payee, Description, Reference | At least one of these on every line. |
| Cheque Number | Optional. |
Typical bank CSVs need several changes to fit: combining separate Paid in and Paid out columns into one signed amount, removing balance rows, converting text dates such as "05 Jan 2026", and stripping currency symbols. Our CSV to Xero converter does all of this in your browser. If you prefer to do it in a spreadsheet, the formula =PaidIn-PaidOut creates the signed amount column, and Format Cells → Date sets a consistent date format before you save as CSV.
Step 3: Import the statement
- In Xero, go to Accounting → Bank accounts.
- Find the bank account and choose Manage account → Import a statement.
- Select your file and choose Import.
- For a CSV, Xero shows your columns and asks you to assign them: Date to Transaction Date, Amount to Transaction Amount, and Payee, Description and Reference to the matching fields. Tick the option to skip the first line, because it contains headings.
- Save and import. Xero tells you how many lines were imported and how many were skipped as duplicates.

Step 4: Reconcile
The imported lines appear on the account's Reconcile tab, alongside any bank feed lines. Match or create transactions as usual. When you've finished, compare Xero's statement balance with your bank statement for the same date.
Troubleshooting
- Dates in the wrong month. The file's date format doesn't match your organisation's region. Convert the dates to the right format and import again.
- All amounts on the wrong side. The amount signs are reversed — common with credit card exports. Flip them before importing (in our converter, tick Swap money in and money out).
- Lines skipped as duplicates. Xero found lines it had already imported for the same dates. That's usually what you want. If they're real repeat transactions, check that the description or reference differs.
- Imported into the wrong account. Delete the imported statement from the account's statement list (under Manage account) and import it into the correct account.